Knowledge Base · User Accounts & Security
Applies to: Connected 10.3+ | Platform: macOS, Windows, Connected on Demand | Prepared: August 2026
ARTICLE CONTENTS
- Overview
- Selecting Password Management
- Connected System Administrator
- Adding New User(s) to Connected
- Granting User Access to Screens, Reports, and Other Options
- Cloning (Duplicating) a User
- Printing a User List
- Advanced User Privilege Settings
- Related Articles
1. Overview
Connected user accounts and access privileges can be managed in one of two ways: Standard or Secure Password Management.
Standard password management, covered in this article, is on by default. It's quick and easy to set up and use. However, since passwords can be added, viewed, and changed by administrators, Standard mode is not considered a private or secure method for preventing unauthorized access. With Standard management, no password policy is enforced.
2. Selecting Password Management
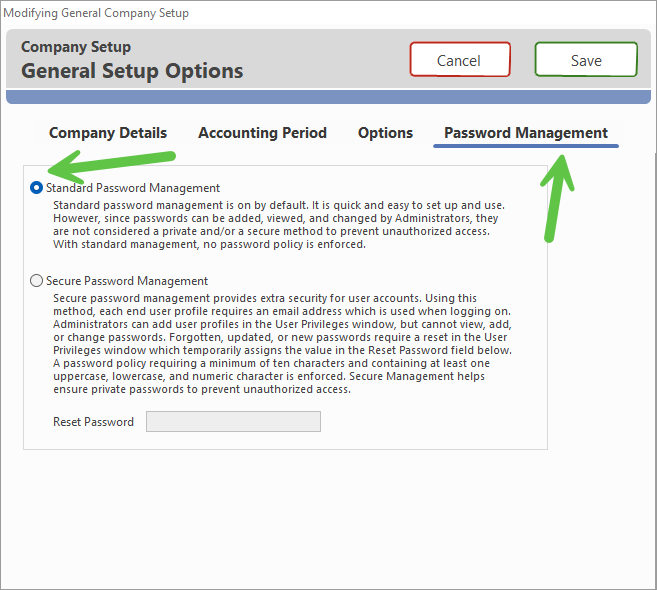
Standard password management is the default setting in all new Connected data files. To confirm that Standard Password Management has been selected:
- Select
File → Company Setup → General Setup.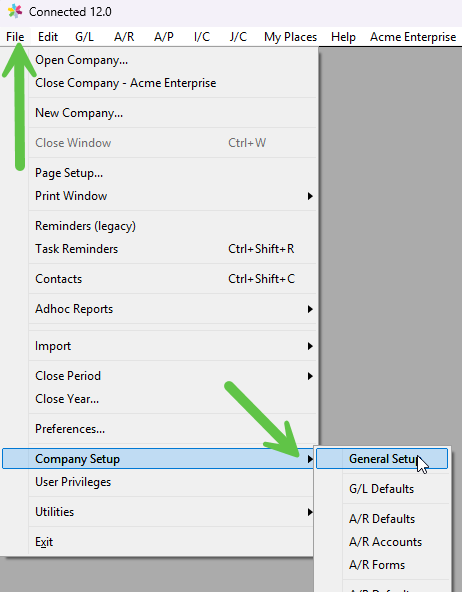
- Click the Password Management tab, which displays the current setting, as shown below.
3. Connected System Administrator
When a new company data file is created, there is a single user account with these default credentials:
| Logon Name | MASTER |
| Password | CONNECTED |
WARNING Both the Logon Name and Password are case-sensitive, and the default credentials must be entered in ALL CAPS. They can be changed at any time, and you can set as many levels of password access as required. Because these default credentials are published here and in other public documentation, we strongly recommend changing them as soon as possible. |
The default user (MASTER/CONNECTED) is preset with administrative privileges. A Connected System Administrator has access to all screens, reports, and settings, and is responsible for adding and editing users and passwords.
WARNING Make sure the System Administrator name and password are not forgotten. If the System Administrator credentials cannot be found, the data file will need to be sent to our Technical Support team so the credentials can be restored. |
System Administrators can configure each user to allow certain levels of access to the software. For example, you might give a user the ability to view and browse check information in the Payment window, but not the ability to add or modify payments.
4. Adding New User(s) to Connected
Only users with access to the User Privileges window can add or edit user settings — typically these are users marked as System Administrators. When adding a new user, you'll need to configure access settings for every area of the program. For example, if a user is to have access to Accounts Payable, select the A/P tab in the User Privileges window and grant the options they should have access to.
NOTE By default, a new user is not granted access to any features. All privileges must be assigned, unless the user was cloned from another. |
To add a new user:
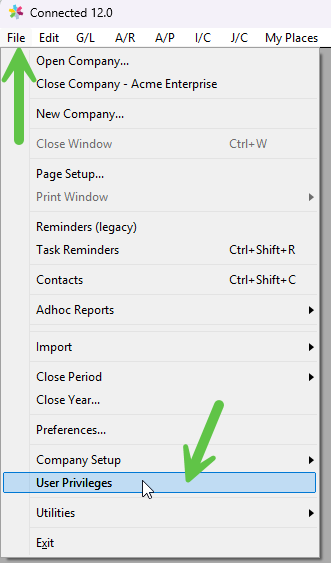
- Select User Privileges from the File menu.
- The User Privileges window opens with Users listed on the left side.
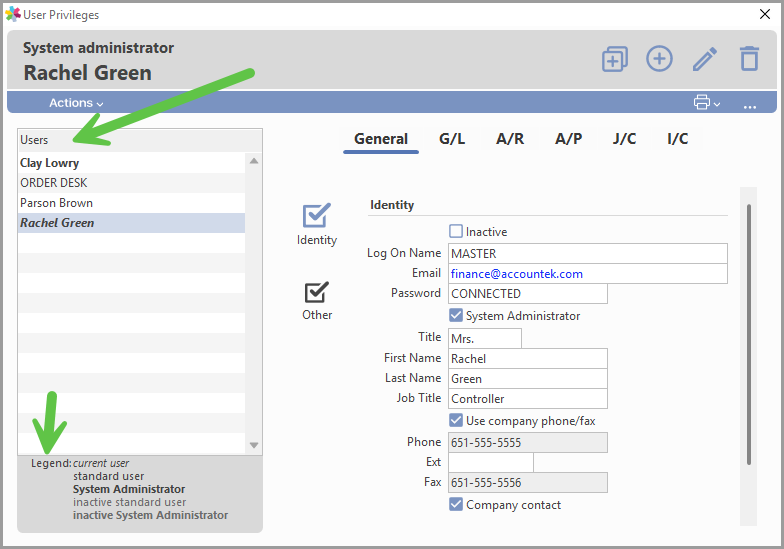
- Click Add. The Log On Name and Password fields become blank.
- Type in the Log On Name and Password to be used for each login. This is the name the user types each time they log on.
- Enter an email address in the field provided. If the Company contact checkbox is selected, the user becomes available as a company contact when addressing email messages — for example, when sending an email with a PDF copy of customer invoices and/or order confirmations.
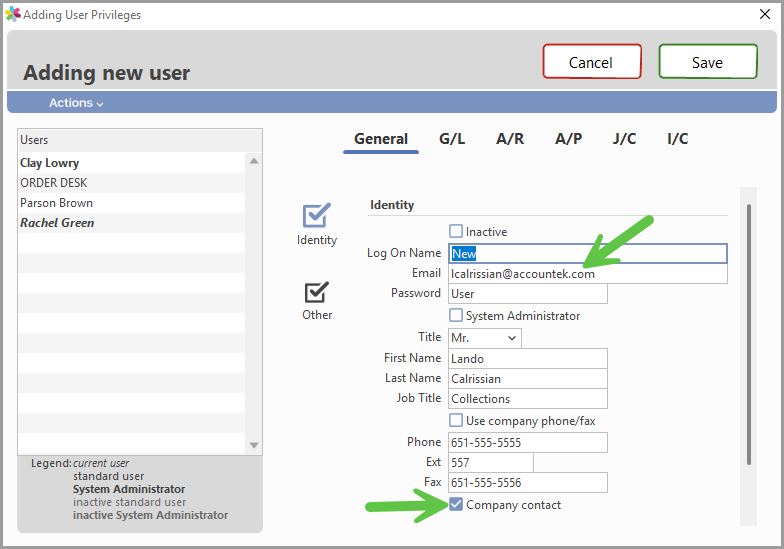
- Select the System Administrator checkbox if the user should have this level of access.
- Enter a Title (optional), First Name, and Last Name. Either a first or last name is required (both are recommended), so that transaction Record Info and Notes (including reminders) show the correct identification.
Reference:
- Connected Reminders and Notifications
- Transaction "Record Info" (aka Audit Trail)
- Click Save to complete the new user setup, or continue to the next section to begin granting access to screens, reports, and other options.
New users — unless added from a clone or marked as System Administrator — default to no access to any screens, reports, or options. Enabling access is explained in the following sections.
5. Granting User Access to Screens, Reports, and Other Options
As mentioned in the previous section, new users default to no access to any screens, reports, or options, unless cloned from an existing user or marked as a System Administrator.
To grant a user access to screens, reports, and options:
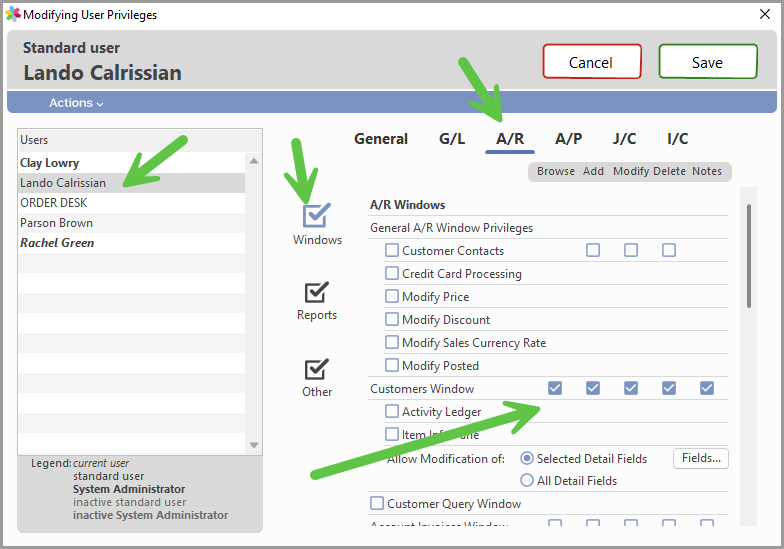
- Click the user on the left side and click Modify to edit an existing user account. If you're adding a user for the first time, continue to step 2.
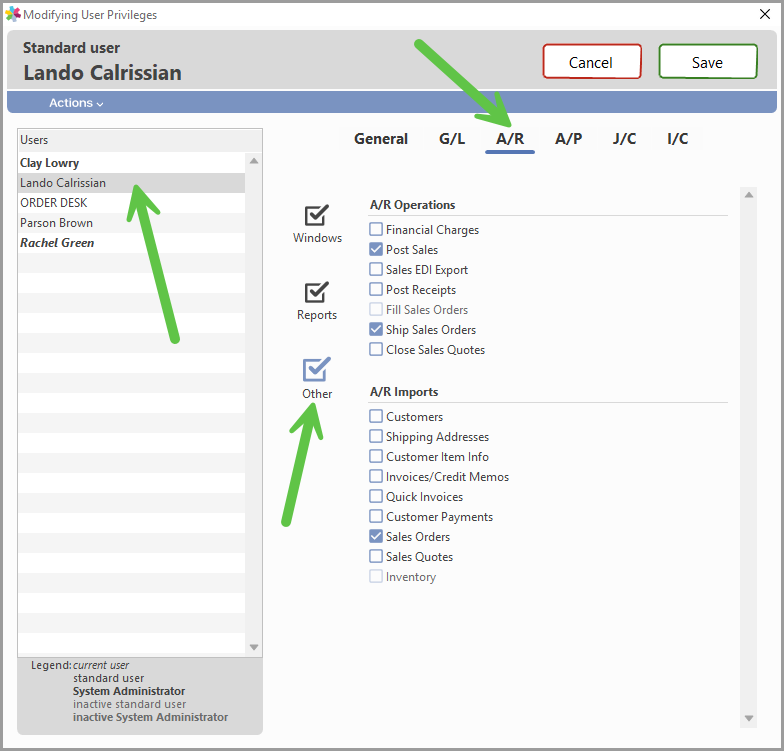
- Click the tab for a module — A/R, for example — and select the options for the new user. The screen below shows an example configuration for the A/R module.
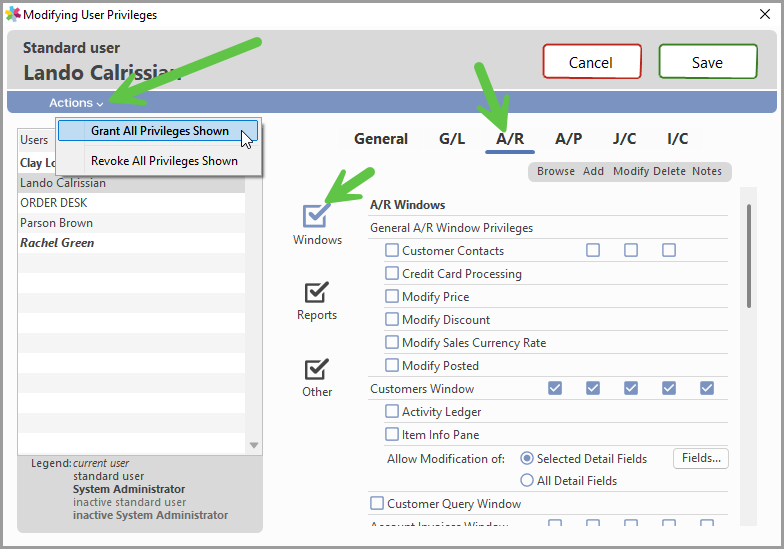
- To grant a user access to all privileges shown under the active tab (A/R, in this example), click the Action menu in the top-left corner and select Grant All Privileges Shown, as shown below.
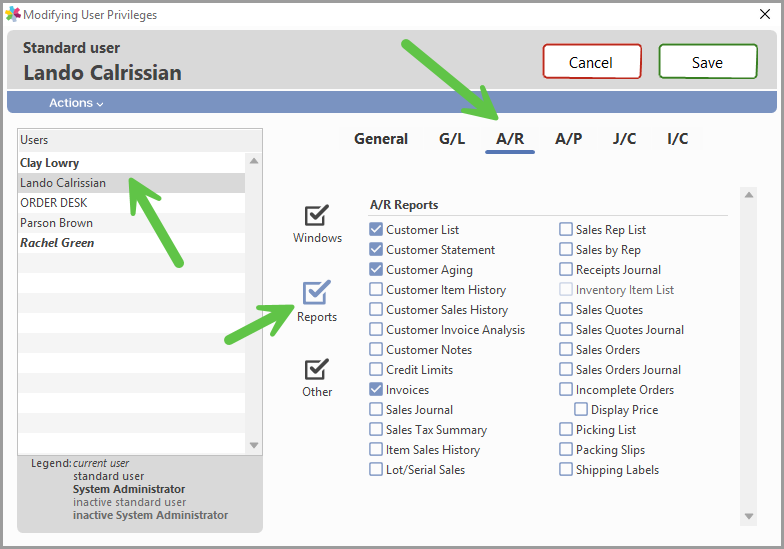
- Click the Reports checkbox to see and select the available reports for that user/module, as shown below.
- Click the Other checkbox to see and select available options — such as posting and importing — for that user/module, as shown below.
- Press ENTER or click Save to update the user's access privileges.
To test a user's access privileges, exit Connected and log on using the new or updated user's credentials.
6. Cloning (Duplicating) a User
When a company has many users accessing Connected, some will likely need the same or similar user privileges. Cloning (duplicating) user accounts that share a common set of privileges can save time when setting up new user accounts.
For example, when a company uses the Manufacturing feature in Connected, production users will typically need access to the same or similar items: the Manufacture screen, Post Manufacture (build), Inventory Items and BoM, and the Manufacture Report.
To clone (duplicate) an existing user:
- Open the User Privileges window from the File menu.
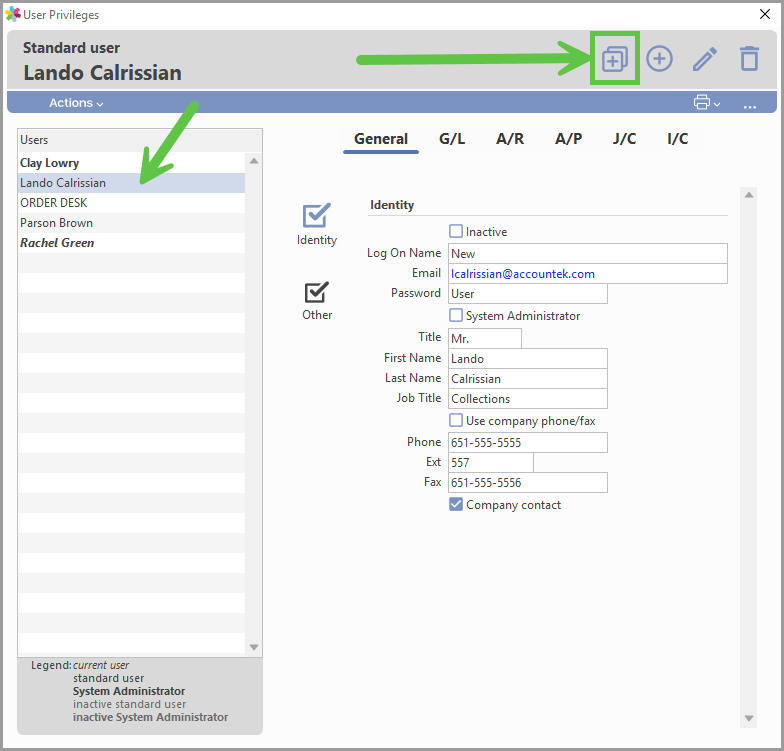
- Highlight the user to clone in the left pane, under the Users heading, and click Clone, as shown below.
- Enter a unique Log On Name, Email, and Password.
- Enter a First Name and/or Last Name (both are recommended).
- Confirm all user settings on each module tab. These should be reviewed, since the new user is based on an existing user's settings.
- Press ENTER or click Save to add the new user's access privileges.
7. Printing a User List
Printing a user list is useful for quickly verifying all active and inactive user credentials. Passwords are not included when a user list is printed.
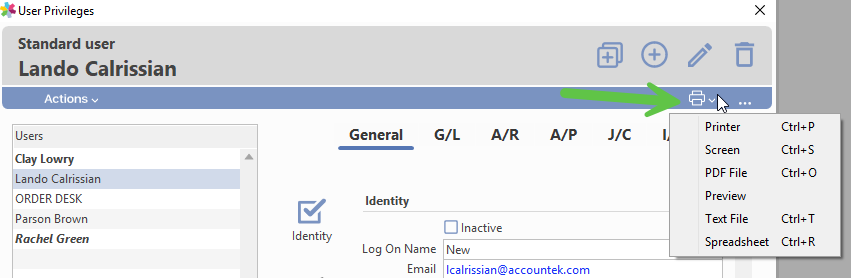
To print a user list, click Print in the upper-left corner of the User Privileges window and select a destination. If Spreadsheet/Text file is selected, a flattened export file is created that includes a few additional fields not shown on the screen/printer version of the report.
8. Advanced User Privilege Settings
There are several unique user privileges that can be assigned using advanced settings in specific areas of Connected. A few examples are explained below.
8.1 Field Specific Access in the A/R Customers Window
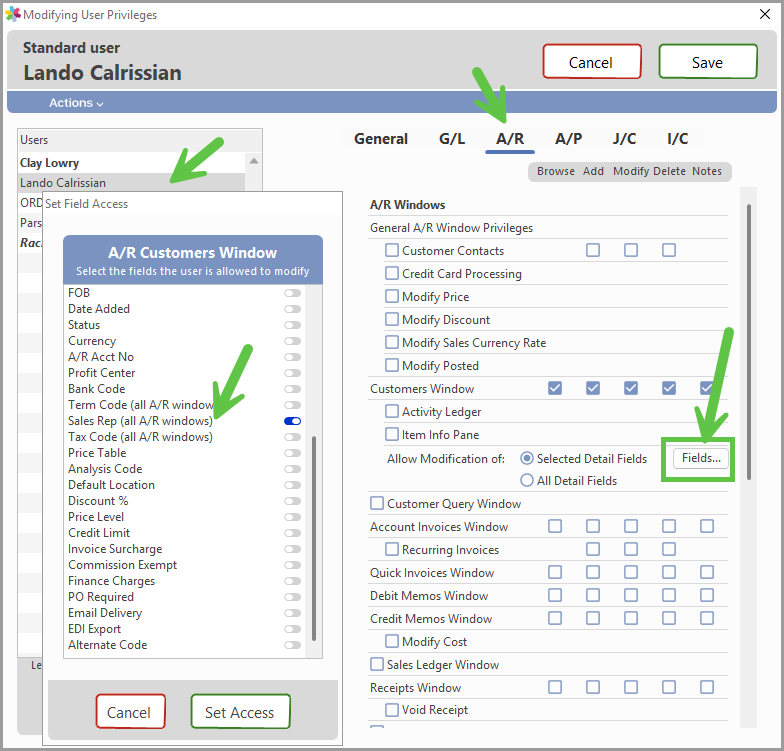
The Customers window supports field-level access, so a user can be authorized to edit select fields. For example, you may want a customer service employee to be able to edit customer address information, but not sensitive information like Credit Limits, Payment Terms, and/or Sales Reps.
Additionally, if the Terms Code, Sales Rep, and Tax Code fields are not selected for edit, these fields will be blocked in all A/R windows. For example, the Sales Order will display these fields but not allow edits.
8.2 Edit/View Price and Discount Detail Line Fields
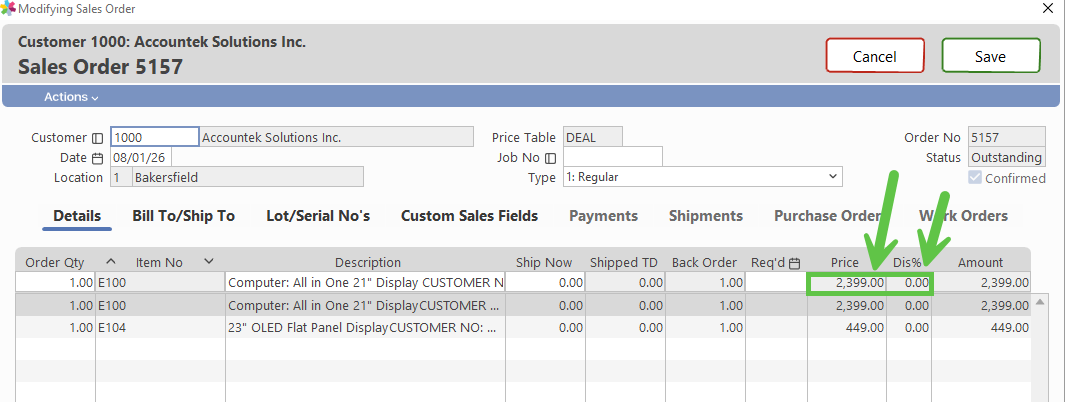
Specific users can be blocked from editing the Price and/or Discount fields in all A/R windows (Account Invoice, Sales Order, Sales Quote, Quick Invoice, and Credit Memo). This is useful when fixed pricing is in use and shouldn't be changed or discounted except by specific users. The Price/Discount fields remain visible but can't be changed. Disabling these fields can also save up to two TAB stops per line during data entry.
An example of the Account Invoice window with both Price and Discount line-item fields blocked, in edit mode, is shown below:
8.3 Blocking Access to Cost/Margin Info on Quotes, Orders, and Invoices
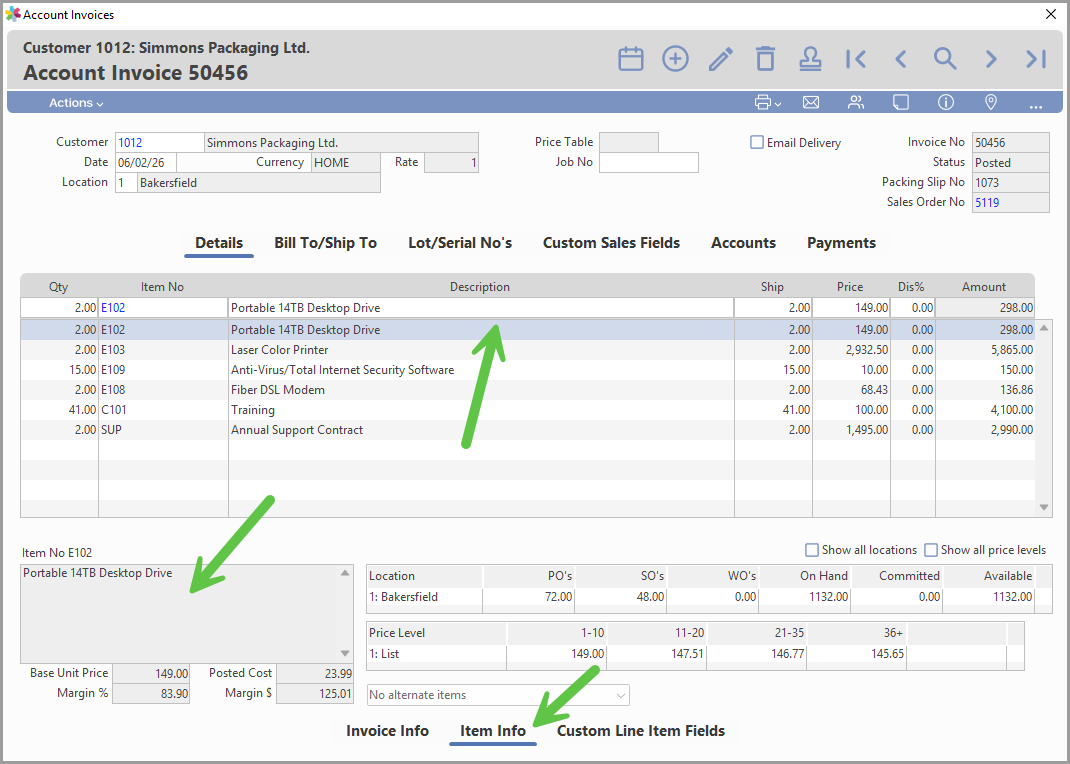
If margins and costs should be hidden from specific users, these fields can be blocked from view in the Sales Quote, Sales Order, and Account Invoice windows. An example showing the fields (not hidden) in the Account Invoice window is shown below.
9. Related Articles
Was this article helpful?
That’s Great!
Thank you for your feedback
Sorry! We couldn't be helpful
Thank you for your feedback
Feedback sent
We appreciate your effort and will try to fix the article