Knowledge Base · Intro to Connected Reports
Applies to: All Supported Versions | Platform: All Platforms
ARTICLE CONTENTS
- Introduction to My Reports
- How to use My Reports to Drill Down for Information
- Using Markups and Notes on My Reports
- How to Copy/Paste Data from My Reports
- How My Reports are Saved, Named, and Deleted
- Related Articles
- Reference Links
1. Introduction to My Reports
"My Reports" is a unique report output option because it creates a version of the report in the Connected Desktop window for the specific user account. My Reports report versions support drill down from the report window to the source data and are saved so they can be viewed again without re-generating the report. Certain reports, which tend to lend themselves to month end/year end reconciliation, are great examples of how this feature can be leveraged.
The following is a sample of how the My Reports selection is made and the output process.


1.1 Key Features of My Reports
The following are key features of My Reports:
- Support for drill down to source transaction of either Summary or Detailed
- Store up to 15 different versions of various reports, which are available until deleted. All My Reports are saved even if the application is closed and reopened.
- My Reports are specific to user accounts, meaning, each user can have up to 15 different versions of the table reports stored under My Reports that are unique to that user. This also keeps sensitive reports linked to the user that generated them only. See Creating Connected User Accounts and Access Privileges for more information.
- Ability to mark up and add notes to lines (Version 11)
1.2 Reports that Support a My Reports Output
The following reports support a "My Reports" output:
- General Ledger - Chart of Accounts Report
- General Ledger - Income Statement Report
- General Ledger - Balance Sheet Report
- General Ledger - Trial Balance Report
- Sales and Receivables - Customer Aging Report
- Purchasing and Payables - Vendor Aging Report
- Inventory and Manufacturing - Inventory Valuation Report
Added in Connected Version 11.1:
- General Ledger - Financial History Report
- Sales and Receivables - Customer Invoice Analysis Report
- Sales and Receivables - Sales Tax Summary Report
- Sales and Receivables - Receipts Journal Report (Summary type only)
- Sales and Receivables - Sales by Rep Report
- Sales and Receivables - Lot/Serial Sales Report
- Purchasing and Payables - PO Receivings Report
- Purchasing and Payables - 1099 Report
2. How to use My Reports to Drill Down for Information
The Summarized version of a report -=> Drills down to the GL Account window, listing all transactions. From there, users can continue to drill down to the individual transactions.
The Detailed version of a report -=> Drills down to the GL Transaction behind the selected line item.
What is unique about the My Reports section is the drill down that is available to the source data, directly from the My Reports window.
2.1 Example: Trial Balance - Summary Drill Down
The following screen shows the Trial Balance with a Report Type selection of "Summary". When "My Reports" is selected, the output will appear under the "My Reports" of the Connected Desktop.

A save window will pop up that allows users to name the report, and to enter in comments.
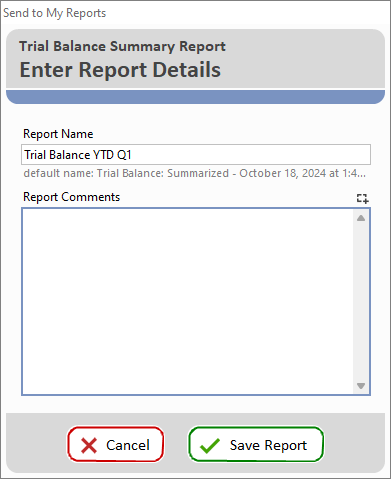
Once the output is created, a line can double clicked to drill down.

By clicking on this line and drilling down, the Accounts Window opens on top of the My Reports window. Double click the detail line, within the Accounts window, to see the specific transaction.

2.2 Example: Trial Balance - Detail Drill Down
The following screen shows the Trial Balance with a Report Type selection of "Detailed". When "My Reports" is selected, the output will appear under the "My Reports" of the Connected Desktop.

Once the output is created, a detail line can be double clicked to drill down.

By clicking on this line and drilling down, the General Journal transaction for the selected line opens on top of the My Reports window.
TIP Click the hyperlink beside the "Source" field to drill down to the source transaction. |

3. Using Markups and Notes on My Reports
*This feature is available in Connected Version 11.X and up
Within the My Reports window, a user can mark up and add notes to individual lines. These notes and highlights are saved and can be reviewed, modified, or removed at a later time.
The available mark up features include:

Bolded, Italicized, Line Striked, Underlined, Text Color changed, Highlight Line
Here is an example of how these features can be used on a Trial Balance Report in the My Reports window.

In additional to visual line markups, specific short notes can be added to each line.

4. How to Copy/Paste Data from My Reports
All or select data can be copied/pasted directly into a spreadsheet from My Reports output. This is a quick and easy way to move data to online applications such as Google Sheets if Microsoft Office is not being used.
To Copy/Paste all or selected data:
Hover the mouse over the "Copy" icon on the top right-hand side as indicated below.

Click the "Copy" icon and a menu will appear with four options.
- Copy Selection - copy only the selected lines
- Copy Selection with Column Labels - copy only the selected lines and the column labels
- Copy Selection with Entire Header - copy selected lines, column labels, and the report header information
- Copy Entire Report - All data will be copied, including totals, column labels, and report header information

After a selection is made, a user can then open a spreadsheet and paste the information as selected.
TIP If a selection is to be copied, highlight the specific rows of data before making a copy selection |
Below is an example of the "Copy Entire Report" option.

5. How My Reports are Saved, Named, and Deleted
When a user sends a report to the My Report window, it is saved and named using the following:
- Report Type (Trial Balance Summarized)
- Date (2/22/2023)
- Time (1:23:30 PM)
This way, unique copies of the same report, but run at different times/dates, can be saved. The inclusion of the date/time can help with changes made to the same report run at different date/times, which can be very useful for reconciliations.
Each user can save up to 15 different My Reports under their login. These are unique to that user, and will not be seen by any other users. See Creating Connected User Accounts and Access Privileges for more information on user accounts.
To delete a report in the My Reports window, select it in the drop down list, and then press the Trash icon to the right of the name.

6. Related Articles
- Accessing Connected Reports
- Reporting Interface and Output Options
- 3 Essential Tools Every Connected User Should Know
- 1099-NEC Non-Employee Compensation
7. Reference Links
Was this article helpful?
That’s Great!
Thank you for your feedback
Sorry! We couldn't be helpful
Thank you for your feedback
Feedback sent
We appreciate your effort and will try to fix the article