Knowledge Base · Importing Data
Applies to: All Supported Versions | Platform: macOS, Windows, Connected on Demand
ARTICLE CONTENTS
1. Overview
Use this function to reduce the time entering your chart of accounts or to transfer an existing chart from another software package.
2. Preparing Connected
Before importing the chart of accounts you must have completed the following:
- Entered your Company Information in the General Setup screen.
- Defined your Profit Centers and Departments if appropriate.
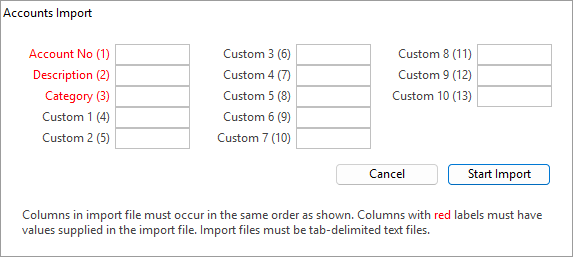
There are certain fields that are essential for the import; they are indicated with red labels and show in the following Accounts Import screen.
3. Preparing the Spreadsheet
Before importing data, you will need to review and prepare your spreadsheet according to the import order and field requirements. The following reviews the field requirements for the Accounts import.
- Account No - Must appear as
xxxxx-xx-xx. If Profit Centers and Departments are not active, please ensure that the Account No. appears asxxxxx-00-00. This is a numeric field. - Description - Alphanumeric field. Maximum length 30 characters.
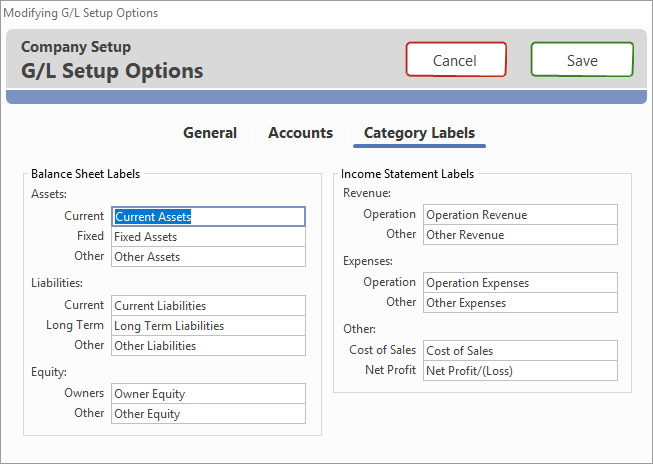
- Category- Select from the following shown in the screen below (case sensitive). The category labels can be changed to fit individual company needs and therefore they should be reviewed prior to importing.
NOTE Make sure that your spreadsheet has been saved as a tab-delimited text file. |
4. Importing
To import Accounts into the General Ledger:
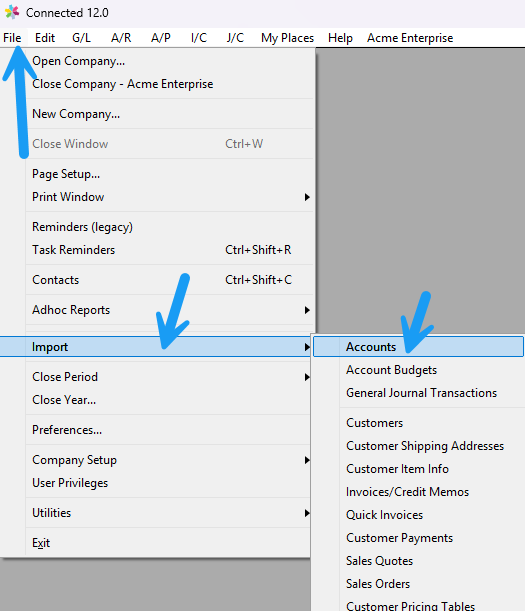
- Select Import from the File menu and choose Accounts. The Accounts Import window appears.
- Click Start Import and choose the file that you want to import from the selection window. If you have not placed it into the same folder as your data file, you will have to navigate through your folders/directories to find it.
- A final warning message will appear reminding you to make sure that you have a backup before proceeding. Click Yes to continue or No to cancel.
- When the import is complete, an OK message will appear indicating how many successful records.
5. Possible Errors
- Invalid Account No. - Does not match xxxxx-xx-xx
- Invalid Account No. - Invalid Profit Center code
- Invalid Account No. - Invalid Department code
- Invalid category code - (Case sensitive)
- Duplicate Account No.
6. Related Articles
- G/L Transactions (aka Journal Entries) Import
- Quick Invoice Import for E-Commerce Transactions
- Importing Account Invoices and/or Credit Memos
- Importing to Add or Update A/R Sales Taxes
- Adding a General Ledger Account
- Connected 10.2 Change Log - September 2020
- General Ledger: Trial Balance Report
- My Reports
Was this article helpful?
That’s Great!
Thank you for your feedback
Sorry! We couldn't be helpful
Thank you for your feedback
Feedback sent
We appreciate your effort and will try to fix the article