Knowledge Base · Inventory Control
Applies to: Connected 11.2+ | Platform: macOS, Windows, Connected on Demand
ARTICLE CONTENTS
- Overview
- Create a Count Spreadsheet
- Updating Actual On Hand in Connected
- Related Articles
- Reference Links
1. Overview
An Inventory Count is usually done at least once a year and sometimes more frequently. The purpose is to take quantities from a physical count and compare them to the on-hand quantities in Connected. Where the two don't match, adjusting entries are created: an Inventory Receiving to increase the quantity, or an Inventory Withdrawal to decrease it. Adjusting entries can be done manually or via a count import.
There are multiple ways to generate count sheets which can be used as a standalone or to assist preparing an inventory count import file.
2. Create a Count Spreadsheet
There are three ways to create an Inventory Count Sheet. The decision on which method to use depends on the type of inventory and setup a company has.
2.1 Method 1 - Inventory Count Sheet - Item List Report
PROS Simple report. Easy to create import file for adjustment. | CONS No on hand quantities or variances. No location info. |
Inventory Count Sheet - Item List Report
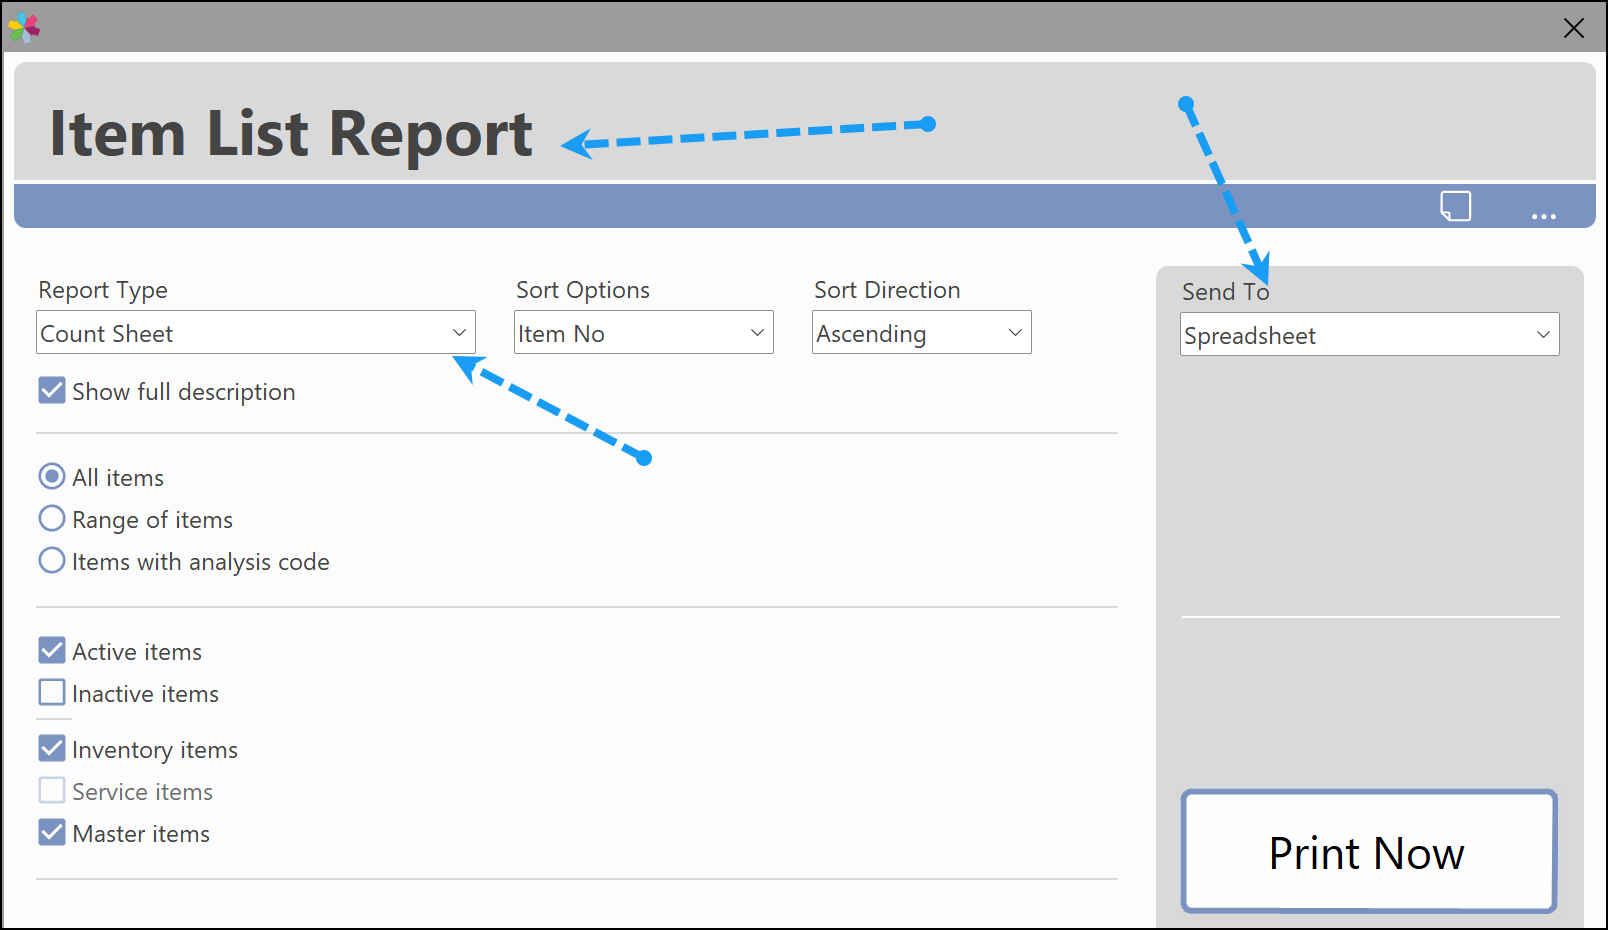
- Create a printed report or spreadsheet by choosing the 'Count Sheet' option within the Item List Report, as shown below.
- This option is good for having a list of items and entering the physical count only.
- There will not be any current on hand quantities or variances with this option.
2.2 Method 2 - Inventory Variance Spreadsheet - Item List Report
PROS Includes On Hand Quantity by Location | CONS Includes all locations without option to filter. |
Inventory Variance Spreadsheet - Item List Report
TIP The inventory variance spreadsheet is the only option to include Item Lot/Serial number information |
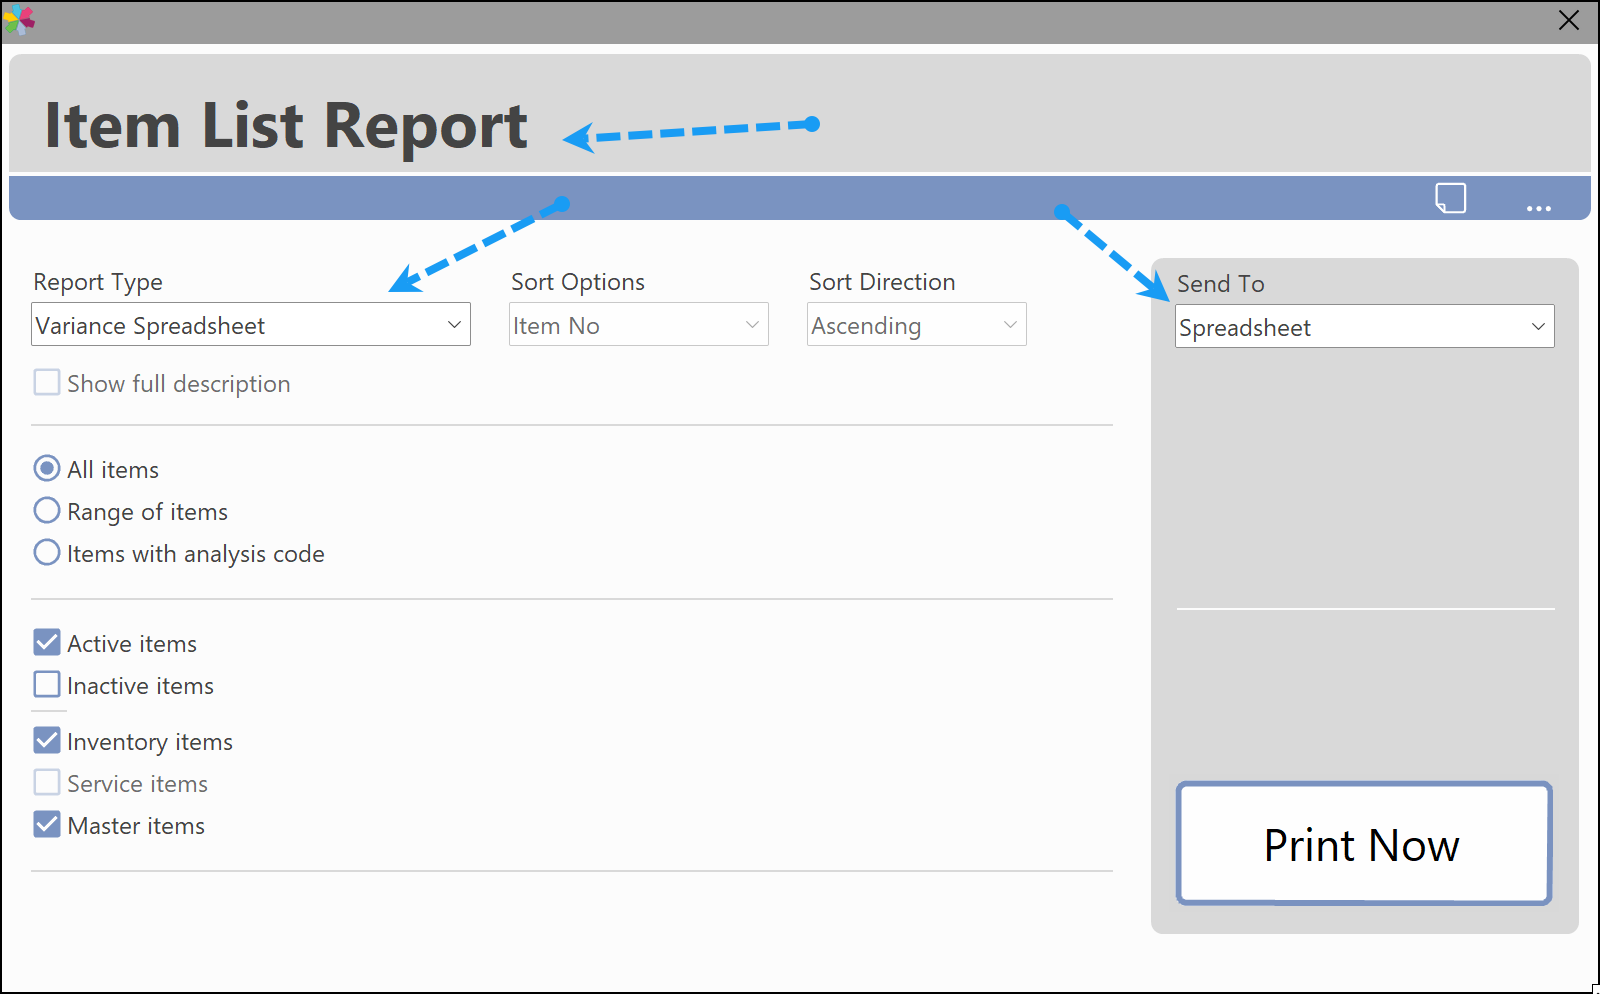
- This is a report from the dropdown menu in the I/C Module.
- From the Item List Report, select the "Variance Spreadsheet" option.
- Select the "Send to Spreadsheet" option.
- The export will contain a separate column in which the physical count can be entered for each item.
- This export may not be ideal if many inventory locations are in use because all locations are exported.
NOTE If inventory is stored in multiple locations, a separate count sheet is required for each location. |
2.3 Method 3 - Inventory Item Query Window - Create/Filter Export to Spreadsheet
PROS Can be filtered by location or sorted by location. Custom field picking to add additional fields to assist with count. | CONS No column for count or variance. Does not include Lot/Serial Information |
Inventory Item Query Window - Create/Filter Export to Spreadsheet
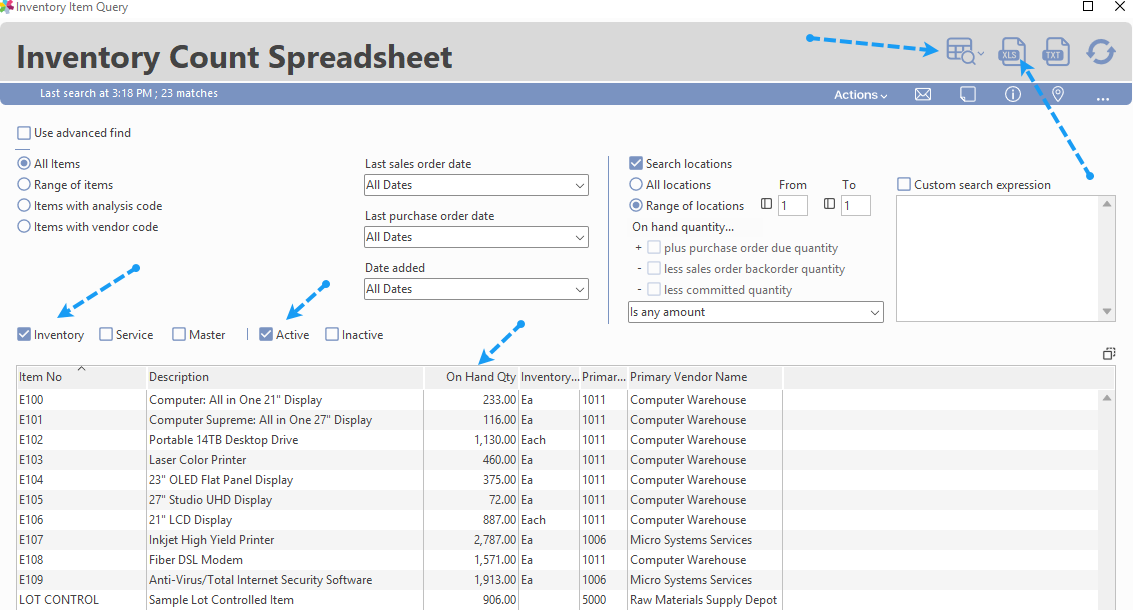
- Use the Inventory Item Query window to export a filtered list of items with their on hand quantities.
- Customize the output by selecting columns as required to be included.
- Locations can be filtered
- Can be saved as a Connected View and accessed at any time.
- Can be exported to a spreadsheet
TIP Read about how Query Windows work in Connected here. |
As a count is completed, values on the count sheets can be updated manually by hand on paper, or by using a spreadsheet and recording the actual amounts there.
3. Updating Actual On Hand in Connected
There are two ways to update the On Hand Quantity of an item in Connected.
- Manual Adjustments - Used for Lot/Serial Counts, smaller changes.
- Inventory Count Import - Done by Location, uses a prepared .txt file, used for big lists of quantity changes.
3.1 Manual Adjustments
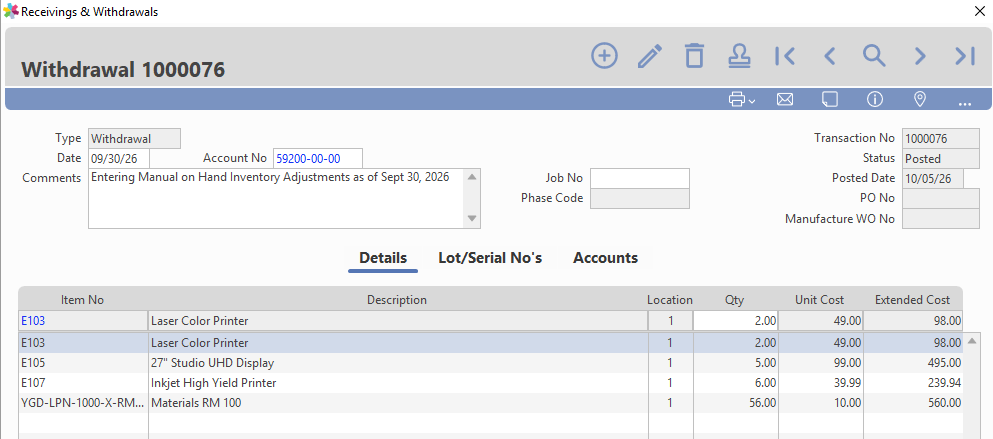
- Entered via the "Receivings & Withdrawals" window in the I/C Module
- The values used are the net change to the item's quantity. This would have been calculated in a prior step.
- Locations can be specified
- Items that are lot/serial number controlled have to be entered manually using this method
3.2 Inventory Count Import
NOTE The "Import" of the Inventory Count does not apply to items controlled by Lot or Serial Number. Lot/Serial Controlled items need to be adjusted manually via Receiving and/or Withdrawal entries. |
TIP The Import File needs to be saved as a Tab delimited text file. |
The Inventory Count Import has 7 data fields, with only positions (1), (2), being necessary. In this example, only (1) and (2) are used. Each field is listed below:
- (1) Item No (required)- Connected Item Number (exact match)
- (2) On Hand Qty (required) - Numeric field. This is the quantity that was counted. Negative values are not allowed.
- (3) Description - Item description. This field is for reference purposes only.
- (4) Analysis Code - Alpha numeric field. This field is for reference purposes only.
- (5) Bin Location - Alpha numeric field. This field is for reference purposes only.
- (6) Vendor Code - Alpha numeric field. This field is for reference purposes only.
- (7) Cost - This field will only be used if a transaction to increase quantity for items is required. For a decrease in quantity, the existing average cost, or costs in existing open cost layers (FIFO Costing) will be used.
To import the Inventory Count:
- Select Import from the File menu and choose Inventory Count. The following Import Inventory Count window appears:
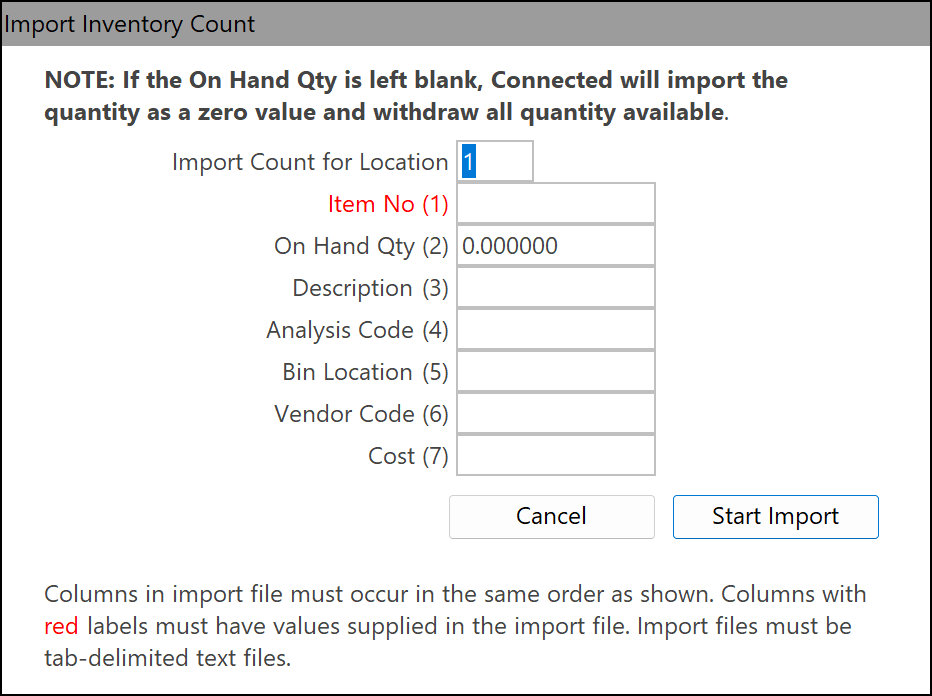
- Enter the location where the quantities will be imported. Each location needs to be done separately.
- Make sure that your spreadsheet has been saved as a Tab delimited text file.
- Click Start Import. Click on the file that you want to import from the selection window. If you have not placed it into the same folder as Connected, you will need to navigate through your folders/directories to find it. A message will appear reminding you to make sure that you have a backup before proceeding.
- Select Yes when prompted in order to proceed. A status bar will indicate the progress of the import.
An import results report will appear indicating a successful import and/or any errors reported.
3.3 Updating the Count - Posting the Inventory Adjustments
Once the manual or import process is completed, adjusting entries will be created. Before the count is updated, these entries will need to be posted.
4. Related Articles
- Inventory Stock Adjustments
- Inventory Costing Methods
- Inventory Item No Field Length - Increase from 15 to 25 Characters
- Allocating Labor and/or Overhead to Manufactured Parts
- Manufacture - Custom Workflow Staging List
- Case Study: Save Money with Barcode Confirmations
5. Reference Links
Was this article helpful?
That’s Great!
Thank you for your feedback
Sorry! We couldn't be helpful
Thank you for your feedback
Feedback sent
We appreciate your effort and will try to fix the article